
Learn the Shape Maker. Lines fairing.
- Alexander Alexanov
- Apr 23, 2020
- 4 min read

Smoothing is a very important process on which the surface quality of the hull shape depends. An important role is played by the means of visual quality control of the curve. The properties of the B-spline curves give us significant advantages of this control.
Let us dwell on the properties of B-spline curves. As mentioned above, by the shape of the control polygon, we can determine the angles of the curve entry at the end points. If the polygon is convex, then the curve has no inflections. If more than three points of the control polygon lie on one straight line, the curve will have a rectilinear section. All these properties allow you to control the shape of the curve by the shape of its polygon.
In addition to this, the Shape Maker provides visualization of the radius of curvature of the curve and inflection points. A good means of control is also to compress the image of the curve along one of the coordinate axes. In fact, this is an analogue of how the designer controls the shape of the line looking along a curve, almost in the plane of the drawing. This function is especially convenient when it is necessary to simulate curves elongated in one direction, such as an airplane wing profile.
The essence of the smoothing process is to obtain a smooth curve as close as possible to a given prototype and aesthetic that meets our idea of it. This is a very subjective process. Two people can depict completely different curves. Therefore, the ideal version of the smoothing process is a combination of manual and automatic mode.
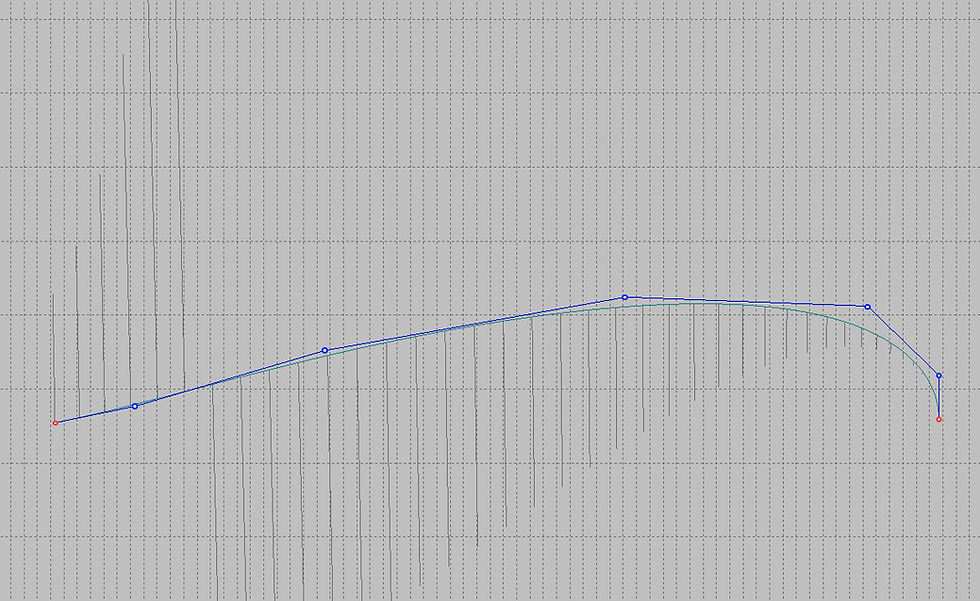
An example of smoothing the deck line. The curve of radius of curvature shows the areas of the curve that require correction. The biggest mistake for beginners is to try to smooth the curve by moving only one control point. The red arrows show how to change the position of several control points in order to achieve a good result. When you change the position of the control point, the shape of the curve and the graph of the radii of curvature automatically changes. As a rule, only a small movement of the control points is enough to significantly change the graph of curvature.

Therefore, to move the points of the control polygon during smoothing, use the scaled cursor movement.Recall that this mode is set by pressing the next button on the Marker toolbar.

As a result of smoothing points, it is not difficult to achieve approximately such a result.
You can display a graph of curvature radii using the following command:

Or from the Modify toolbar:

And setting the specified fields in the next dialog.
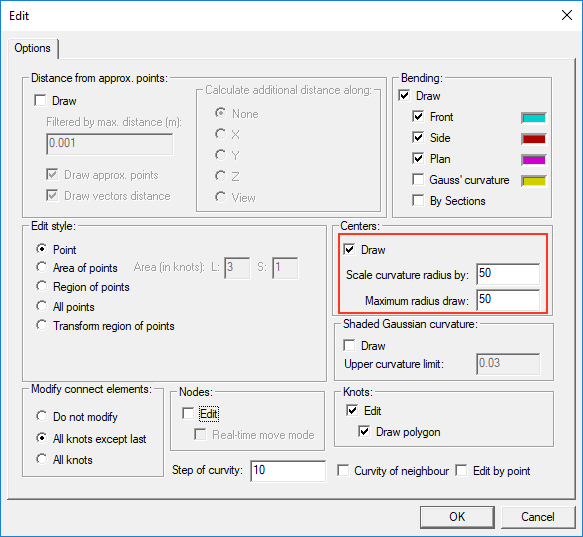
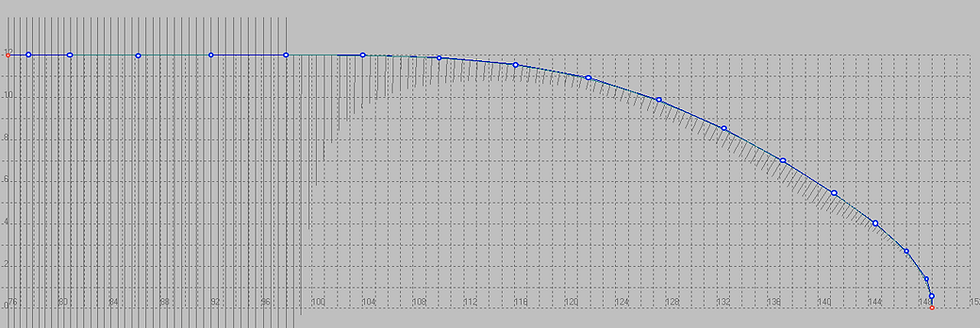
For convenience of visualization, the graph of the radius of curvature is scaled by the corresponding scale factor. To avoid a large number of lines on the screen, the radii of curvature greater than the specified value are cut off. As mentioned earlier, the screen compression mode in length is used to design lines of large elongation, such as the wing profile of an airplane. The line shown below has a large elongation. The shape of such a line is difficult to control.

If you use screen compression along the length, the line will look like this.

It is important to note that only the image on the screen is compressed. All coordinates of the control points remain in real scale. Editing such a curve is much easier.
And, if in a compressed form the curve looks good, then in real scale it will look only better.

Recall that you can switch to the compressed screen visualization mode by clicking on the next field in the status bar.

You can set compression ratios along the coordinate axes with the following command.

Or from the View toolbar.

And set the compression ratios along the coordinate axes in the next dialog box.

Smoothing a curve is a very subjective process. Therefore, in this section, the emphasis is on smoothing the curve manually. There are several different methods for automatically smoothing curves in the system. In this section, we recommend only one of them. To smooth out a part of the curve, just click on one of the control points with the Shift key pressed, then specify the second control point. The specified area of control points will be changed to achieve the desired smoothness of the curve in this area. If the smoothing result does not satisfy, the procedure can be repeated.
Changing the shape of lines lying on the surface.
All that was said above about editing spatial lines fully applies to lines that lie on the surface. When editing a line lying on the surface, it must be remembered that such editing is possible only from the projection with which the line was specified and only on this projection the line shape will correspond to the shape of the control polygon. Other projections of this line are calculated as a result of projection onto the surface.
If during editing a surface line it is impossible to correctly project this line on the surface, a message appears.

Note that during editing, you can change the projection of the line. To do this, you can use the menu command.

Or a button from the Modify toolbar:

And select the appropriate projection in the dialog box.


Grateful for shaaring this